Thursday, August 29, 2013
Sunday, August 25, 2013
Teaching Kids to Give
Typhoon "Maring" that hit Metro Manila last Sunday left thousands of families homeless. It was devastating seeing all those people wading through the floods, and seeing them packed in evacuation centers with no food, no home, and some with no loved ones. It's even more sad that this is happening more regularly now.
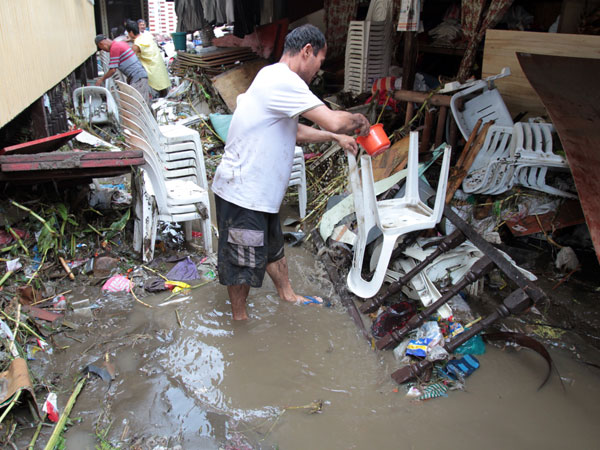 |
| Source: http://newsinfo.inquirer.net/ |
My children, however, were oblivious to all of those things. They were busy with their games, toys, and books. They were clearly enjoying their mini-vacation since classes were canceled.
During that time of calamity, even if we weren't affected directly, I wanted my kids to understand the gravity of the situation and to let them know that there are a lot of ways to help. They don't have to be grown-ups to help.
The opportunity came when my friend, Joyce, organized a group of people to help pack relief goods for the Maring victims in Enderun Colleges. I decided to bring my kids with me. Surprisingly when I mentioned it to them, they were excited to go. I was so thrilled to find my kids so willing to help others.
One of the things I'm learning from other mothers and my reading is how important it is to teach my kids the right values. Many times, we allow ourselves to get pressured into trying to please our kids and give them everything they want. As a mom, I need to find what they really need and give these to them. More than material things, I want them to grow up with lasting lessons that will help them become good people and not spoiled brats. I really want them to learn how to live generously and to be generous to people who may not be able to do anything for them in return. It's easy to be generous to people who you know will give back.
Now I'm thinking of more ways to teach them this. If you have any ideas please share them with me. We don't need another calamity to teach our kids kindness and generosity. We need to teach them now while we have everyday with them.
Below are some photos from the packing.
 |
| Andres, Joyce & Lucas packing corned beef. Andres was thrilled to wear a chef's jacket. |
 |
| The boys, at first, fought over who would pack food and who would separate the plastic bags. Eventually, they all packed food and I was left with the plastics. Andres was amazed with the size of this ladle. It was as big as his head..almost. |
 |
| After packing almost hundreds of corned beef, Tali had to take a break because all the corned beef made her hungry. |
 |
| The kids watched as the soldiers loaded the food we packed into their Army trucks. |
 |
| The whole gang, who helped pack food at Enderun Colleges |
Thanks again Joyce!
Thursday, August 22, 2013

Monday, August 19, 2013
Crafts Tutorial: Paper Pinwheels
Here's a tutorial on how to make Paper Pinwheels. You can also use this to make gum paste pinwheels. They're easy to make but can make a simple cake or cupcake even lovelier.


plain cartolina, cut into 4x4" squares (you can do any size)
printed paper (wrapping paper)
buttons
paper straws or wooden dowel
glue
ruler
glue gun
scissors
pencil
but only 3/4 up on the line.
You can use it in different ways, too.
Put them in a vase or a teapot as a table centerpiece.
Or stick them on a cake to liven up a simple but pretty cake.
You can also use gum paste instead of paper to make them into cupcake toppers.
Wednesday, August 14, 2013

Tuesday, August 13, 2013
Tutorial: How to Make a Rainbow Cake
I don't know anyone who doesn't like rainbows. Adding color is a great way to liven up any dessert table. And what better way to add color than to add a rainbow!


Here's a simple, step-by-step guide on how to make those pretty rainbow layered cakes.
For this example, I'm making a 4-color cake of Red, Blue, Green, and Yellow. You can choose other colors of course, the only limit you have is your imagination (and color-mixing abilities).
STEP 1: Prepare 4 separate batches of cake mix and add different coloring to each batch . You'll be preparing and baking these cakes separately. I don't normally use cake mix since I like mixing my own, but cake mixes are an easy and quick way to try baking out.
STEP 2: Bake each pan in the oven following the instructions of your cake mix.
STEP 3: Remove the baked cakes from the oven, let them cool, and stack them one on top of the other as shown in the picture bellow with a layer of icing in between. This helps the cake stick together.
STEP 4: Cover the whole cake in icing. Make sure the whole thing is completely covered.
STEP 5: Slice the cake and serve. ENJOY!
Wednesday, August 7, 2013

Sunday, August 4, 2013
Hand Painted Cookies
Sometimes it's nice to use simple painting techniques to design the sweets. For these cookies, I simply laid a layer of fondant and hand painted the roses.
Here are two videos on how I did it:
What do you think?
Go try this at home. It's really easy.
Here are two videos on how I did it:
What do you think?
Go try this at home. It's really easy.

Thursday, August 1, 2013
Tutorial: How to Make Those Amazing Ruffles on Cupcakes
I'm the type of person that likes to learn as much as I can about the things that interest me - which is mostly baking, cake decorating, fashion, parenting, and fitness. I just realized I listed those down from unhealthy to healthy. Haha! I have to find some way to balance all the sweets right?
One of the things that always amazes me is how decorators are able to achieve the intricacy and detail they do on cakes and cupcakes. Throughout the years I've studied as much as I can, particularly using videos and posts online to learn some of the things they do. I'd like to share them with you starting with the basics.
Here's one technique you can try today. It's how to make those amazing ruffles that can make any plain cupcake fancy.
Here's what you need:
(I put links on each to give you a better idea on what they are)
2. Pastry Bag
3. Coupler
There are different brands out there so have a look around. You don't always have to get the most expensive one.
Preparation:
1. Fill your pastry bag with icing
2. Install the coupler. Check this guide for a great explanation.
1. Fill your pastry bag with icing
2. Install the coupler. Check this guide for a great explanation.
3. Add the tip
The Magic:
1. Holding the pastry bag at an angle, start on the edges and pipe continuously while rotating the cupcake in your hand. It's important to keep the pressure of your squeezing consistent throughout.
2. Keep rotating the cupcake, making your way towards the center, filling the whole top of the cupcake with ruffles.
3. Stand back and admire your work!
2. Keep rotating the cupcake, making your way towards the center, filling the whole top of the cupcake with ruffles.
3. Stand back and admire your work!
There you have it! A simple way to make your cupcakes extra sweet!
Thank you for reading my tutorial Have a special day!
Subscribe to:
Posts
(
Atom
)